Views: 0 Author: Site Editor Publish Time: 2025-12-08 Origin: Site


A display case performs far more work than a simple storage box. It acts as a dedicated sales vehicle for a high-end product, a hygiene barrier for fresh food, or a critical preservation environment for rare historical artifacts. The quality of this enclosure directly influences how viewers perceive the value of the object inside. A poorly constructed box with bubbly seams detracts from the contents, while a museum-quality case disappears, leaving only the item in focus.
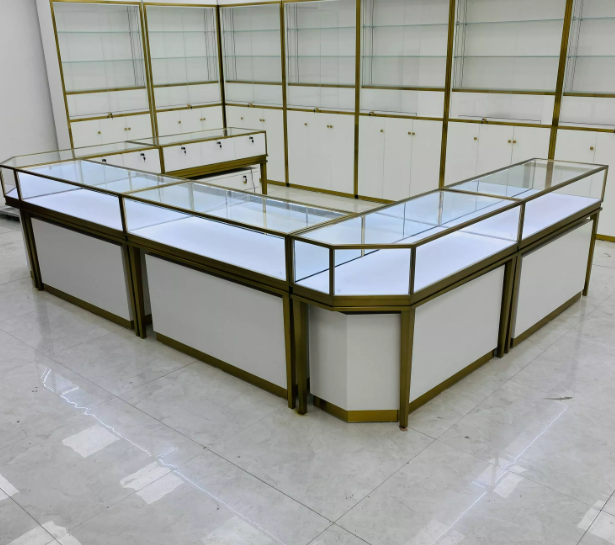
You face a distinct trade-off when deciding how to acquire one. Building it yourself offers precise control over dimensions and potential cost savings on materials. Buying one guarantees certified security features and a standardized, polished finish without the labor. This decision often hinges on whether you need a unique size or a scalable solution for multiple locations.
This guide moves beyond hobbyist methods that rely on super glue and rough saw cuts. We will cover professional fabrication techniques, including solvent welding, router trimming strategies, and material selection criteria suitable for commercial environments. You will learn how to achieve the seamless, "invisible" finish found in high-end galleries.
Material Matters: Why Cast Acrylic (Perspex) is preferred over Extruded Acrylic for custom fabrication due to machining capabilities.
The "Invisible Seam" Standard: Professional results rely on solvent welding and router trimming, not just gluing saw-cut edges.
Commercial Viability: When DIY fabrication yields a higher ROI than purchasing pre-fab units (and when it doesn't).
Environment Logic: Adjusting design based on contents—security for jewelry, humidity control for humidity-sensitive items, and exhaust for electronics.
Before cutting a single sheet of plastic, you must define exactly what the enclosure needs to do. The environment dictates the material, and the material dictates the construction method.
Your first choice lies between visibility and durability. Acrylic is the dominant choice for DIY fabrication because it is lightweight, optically clearer than standard glass, and easy to machine with standard woodworking tools. However, it scratches easily. Glass offers superior scratch resistance and rigidity but requires specialized equipment to cut and polish safely. For most custom projects involving intricate sizes, acrylic is the practical winner.
Security is another major factor. A simple dust cover does not need heavy-duty reinforcement. However, if you are designing a Jewelry Display Cabinet, simple acrylic bonding may be insufficient against theft. High-value items often require polycarbonate layers or tempered glass with integrated locking mechanisms, which are difficult to fabricate in a home workshop.
Selecting the correct grade of plastic is critical for professional results. Many beginners make the mistake of buying the cheapest clear sheet available at a hardware store, which is usually extruded acrylic.
Cast Acrylic: This is the industry standard for a custom display case. It is poured into a mold rather than pushed through a roller. When you cut or route cast acrylic, it produces flaky shavings. It melts cleanly during polishing and absorbs solvent cement evenly.
Extruded Acrylic: This material has internal tension from the manufacturing process. It often gums up router bits and can craze (crack efficiently) when solvent is applied. Avoid this for high-quality display boxes.
Polycarbonate (Lexan): While incredibly impact-resistant (used in bulletproof windows), it has poor scratch resistance and is difficult to glue cleanly. Avoid this for aesthetic displays unless vandalism is a genuine risk.
Different industries require specific material properties. A Bakery Display Cabinet requires food-safe materials (FDA approved) and specific geometry. You must design coved internal edges to prevent crumb buildup and ensure the unit meets sneeze guard height compliance.
Conversely, a display for archival documents or textiles prioritizes UV filtration. Standard acrylic blocks some UV light, but museum-grade sheets are available that block up to 98% of harmful rays to prevent yellowing or fading of the artifacts inside.
A well-made case with poor proportions will still look amateur. The visual balance between the object and the enclosure is just as important as the bond quality.
Avoid overcrowding the object. If the walls of the case are too close to the item, the display feels cramped and the object looks larger than it is, but in a chaotic way. A general rule of thumb is to add 20–30% volume around the object. This negative space allows the viewer's eye to rest and frame the item properly.
For height, a safe calculation is: Object Height + Base Thickness + 25mm clearance (minimum). This ensures the top panel does not visually "crush" the item.
Acrylic is not as rigid as glass. If you build a wide case with thin material, the top panel will sag under its own weight over time. Use the following thickness guide for structural stability:
| Case Longest Dimension | Recommended Thickness (Cast Acrylic) | Reasoning |
|---|---|---|
| Under 30cm (12") | 3mm (1/8") | Sufficient rigidity for small models or collectibles. |
| 30cm – 60cm (12" – 24") | 4.5mm (3/16") | Prevents bowing; provides more surface area for solvent bonds. |
| Over 60cm (24") | 6mm (1/4") or higher | Essential for structural integrity. Large spans may require internal bracing. |
This is the most crucial fabrication tip for professional results. When working with wood, you cut to the exact size. When working with acrylic for solvent welding, you do not cut to the exact final size initially.
The "Pro Method" involves cutting your top and bottom panels 3-5mm oversized. You bond the side panels to the face of the oversized base. Once the chemical bond is cured, you use a router with a flush-trim bit to shave off the excess lip. This technique guarantees a perfectly flush edge every time, removing the need for impossible precision during the initial saw cut. It is the only reliable way to achieve a "seamless" museum-quality edge in a small workshop.
Fabricating a high-end custom display case is less about carpentry and more about chemistry. You are not gluing parts together; you are fusing them into a single monolithic unit.
Standard saw blades leave rough, chipped edges. If you apply solvent cement to a rough edge, the fluid will not flow evenly, leaving thousands of tiny air bubbles in the seam. These bubbles are structurally weak and visually distracting.
If you are not using the flush-trim method mentioned above, you must prepare the edges before bonding. This involves scraping the edge with a cabinet scraper or wet-sanding it to at least 400 grit. The smoother the edge, the clearer the final joint will be.
Solvent cement (often Di-chloromethane based) works by temporarily dissolving the acrylic polymer chains. When the solvent evaporates, the chains re-link across the joint.
The Technique:
Use the "Capillary Action" method. Assemble the box dry using clamps or 90-degree jigs to hold everything perfectly in place. Load a specialized needle applicator bottle with the solvent. Gently run the needle along the inside corner of the joint without squeezing too hard. Allow the physics of capillary action to pull the thin fluid into the seam.
Curing:
The joint will "set" in about 20 minutes, meaning you can carefully move it. However, it is not "cured." It takes 24–48 hours for the solvent to fully evaporate and the bond to reach full strength. Rushing this step often leads to snapped joints.
Once the box is built and cured, the finishing steps separate professional work from amateur attempts.
Router Flush Trim: Run a router with a bearing-guided flush-trim bit around the overhangs. This leaves a frosted, perfectly flat edge.
Sanding Schedule: Wet sand the routed edges. Start at 400 grit to remove router marks, then progress to 600, 1000, and finally 2000 grit. The edge should look smooth and consistent, though still slightly cloudy.
Flame Polishing: This is an advanced technique. Use a MAPP gas torch (propane is often not hot enough) to quickly sweep a blue flame across the sanded edge. The intense heat momentarily melts the surface, snapping it into a glass-clear finish. Warning: Move quickly. If you linger, the acrylic will boil and bubble, ruining the piece permanently. Practice on scrap first.
Solvent-welded acrylic boxes are sleek, but they aren't the only option. Sometimes a frame structure is necessary for aesthetic or structural reasons.
Frames are ideal for very large items where acrylic welding becomes structurally unstable or where the cost of thick acrylic is prohibitive. They are also preferred for aesthetic theming. A rustic wood frame suits antique tools, while sleek brushed metal framing complements modern art or industrial prototypes.
You can use MDF or hardwoods for the skeleton structure, which makes installing accessories easier. It is difficult to hide wires or hinge screws in clear acrylic. A wooden base or vertical pillar allows you to conceal cable management for lighting or security sensors.
Internally, consider using "Foam Core" for staging. Rather than placing an object on a flat clear floor, you can build varying elevations or backdrops. This transforms the unit from a simple box into a storytelling device, creating distinct environments inside the case.
Proper lighting elevates a display significantly. LED strip channels are the standard solution. Embed these channels into the frame at a 45-degree angle to cast light onto the object without blinding the viewer. Ensure you drill cable paths through the base before final assembly. Hiding wires is the hallmark of a professional build.
Just because you can build it, doesn't always mean you should. For businesses, the "make vs. buy" calculation is financial, not just creative.
Fabrication requires tooling. To achieve the results described here, you need a router, flush-trim bits, clamps, needle applicators, polishing compounds, and MAPP gas torches. If you are building a single case, the cost of tools will likely exceed the price of buying a finished unit. There is also the "Practice Tax"—the likelihood that your first attempt will have bubbles, hazing, or a misaligned seam, requiring a repurchase of materials.
DIY fabrication yields a high ROI for unique dimensions, odd shapes, or single "hero" product displays where a custom commission would cost thousands. However, purchasing is generally higher ROI for rollouts. If you need to outfit 10 franchise locations with a standard Bakery Display Cabinet, the labor hours required to build them yourself will dwarf the cost of buying pre-fabricated, warrantied units. Similarly, cases requiring refrigeration or high-security proprietary locks are best sourced from specialized manufacturers.
Acrylic requires specific care protocols. It attracts dust due to static charge and scratches if wiped with a paper towel. You must plan for cleaning with microfiber cloths and specialized plastic cleaners. Never use ammonia-based glass cleaners (like Windex), as they cause acrylic to craze and cloud over time. Glass does not suffer from static or chemical crazing, making it a lower-maintenance option for high-traffic commercial areas.
Creating a professional custom display case requires a shift in mindset from simple assembly to precision fabrication. The "Oversize + Solvent Weld + Router Trim" method provides the highest standard of finish attainable without industrial machinery, allowing you to create museum-quality enclosures at home.
Before starting, weigh your requirements carefully. If you need specific environmental controls or are rolling out dozens of units, purchasing may be the smarter commercial move. But for that one unique artifact or product that demands perfect presentation, a custom-built case offers an unbeatable combination of protection and visual clarity.
A: For small cases under 30cm (12 inches), 3mm (1/8 inch) cast acrylic is standard and sufficient. For medium cases up to 60cm, use 4.5mm or 5mm to prevent flexing. For large displays spanning over 60cm, you must use 6mm (1/4 inch) or thicker material to ensure the top panel does not bow under its own weight, which can stress the seams.
A: No. Super glue (Cyanoacrylate) is brittle and dries with a cloudy white residue. It often causes "crazing" (tiny stress cracks) near the joint. You must use a specialized solvent cement (like Weld-On 3 or 4) which chemically melts the plastic sheets together for a clear, strong bond.
A: For a Bakery Display Cabinet, glass is often superior for hygiene and longevity. It does not scratch during frequent cleaning and withstands heat better if the case is illuminated or heated. However, acrylic is lighter and safer if the cabinet is mobile or temporary. Ensure any material used is certified food-safe.
A: For light surface scratches on acrylic, use a specialized plastic polish (like Novus 2 or 3) and a microfiber cloth. For deeper scratches, you may need to wet sand with fine grit (1500–2000) before polishing. Do not attempt to flame polish old acrylic that has absorbed moisture, as it will bubble and ruin the piece.

